Table of Contents
3.4: Running the UDP Server and the GetCentroid Algorithm
Ok, so now that we've gone over the code in gory detail (I hope it wasn't too much!), we're ready to transfer data to the UDP server and DMA it to the GetCentroid algorithm and see what results we get.
3.4.1: Opening a Serial Port Connection to the UART on the Zynq7010
You're going to need to open up a serial port terminal program to read the status messages that are being sent from the UART on the Zynq7010 as it boots up (to be more specific, it's actually the mini-USB connector, which provides a USB-to-UART connection from your computer). These status messages are generated with the calls we make to printf() or xil_printf() in our echo.c and main.c files. My preference for a terminal program is RealTerm, but you can use whatever you want.
If you go back to our Vivado Design and check out the UART settings, you'll see that we kept the baud at the default of 115,200. Here are the other settings to use for the COM port in your serial terminal program:
- Baud: 115,200
- Stop Bits: 1
- Parity: None
- Data Bits: 8
- Flow Control: None
Make sure you're connected to the mini-USB port on the MicroZed and you should be ready to load the ELF file and see the status messages printed out to the screen when it boots up.
3.4.2: Setting Up The Network Connection
Next, you'll have to set up the Ethernet connection on your computer so you can talk to the MicroZed. You need to put yourself on the same subnet as the MicroZed, so here is a configuration that you can use:
- IP: 192.168.1.11
- Subnet Mask: 255.255.255.0
- Gateway: 192.168.1.1
I'm going to assume you know where to go on your computer to change your network settings.
3.4.3: Making an Ethernet Connection
It may seem like I'm being overly pedantic here, but this part has actually bitten me in the ass a couple of times. There's nothing worse than having all of your code working perfectly, but forgetting to hook things up properly.
If you're trying to use a Cat5 cable to hook your computer directly to the MicroZed RJ45 connector, you have to use a crossover cable. If you don't have a crossover cable, another option is to use a hub or a switch and connect both devices to the switch. This is the option I usually go with.
Now you should have everything wired up correctly, so it's time to run some code!
3.4.4: Loading the ELF file
When we loaded our custom echo.c, main.c, and include.h files and did a refresh in SDK, SDK should have automatically generated a debug Executable and Linker Format (.ELF or .elf) file. We can find that file in the Project Explorer at GetCentroid → Debug → GetCentroid.efl. Right click on that file and select Go to Run As → Launch on Hardware (System Debugger), which will load the .elf file onto the ARM processor through the mini-USB connection. You should see the following messages printed out to your terminal program:
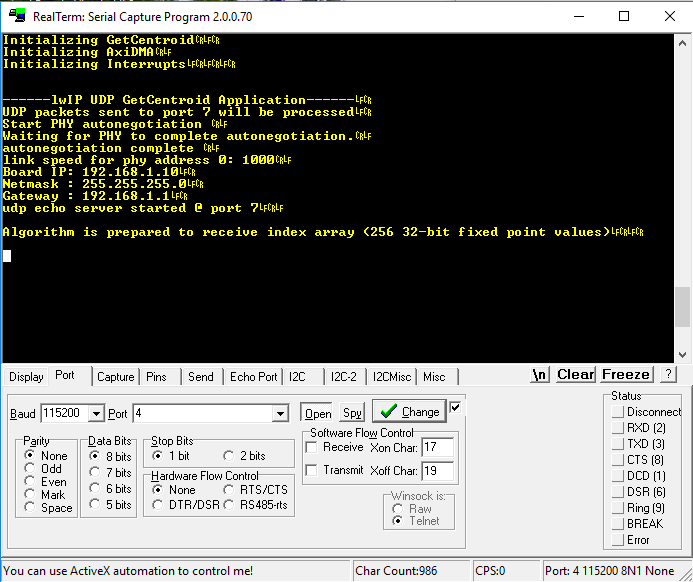
As it says, at this point, our program is just waiting for UDP packets to process. So let's send it some.
3.4.5: Sending the Index Array
As you may recall, the program on the ARM processor is expecting us to send our index array first. To send our data over the Ethernet connection, we're going to use a simple UDP socket application. You can find it here: send_index_array_over_udp.c. I'm not going to go over the details of the code in this file, but if it's unfamiliar to you, I highly recommend you read up on C sockets. You'll find them to be incredibly useful, I guarantee it.
So first of all, download that program. If you're working on a Mac with XCode or a Linux box, you should already have all the libraries you need to compile the program. If you're on a Windows box, I can't help you. The idea of writing C/C++ code on a Windows machine and interfacing to hardware gives me nightmares, so I try to avoid it any way I can.
Assuming your environment is set up properly, you can compile the program using the command:
> ./gcc -o send_index_array_over_udp.o send_index_array_over_udp.c
Once you've compiled it (you should get no errors or warnings), you can run it using:
> ./send_index_array_over_udp.o
If you haven't mucked with the #DEFINE statements, you should see a print out of the index array values in your terminal program.
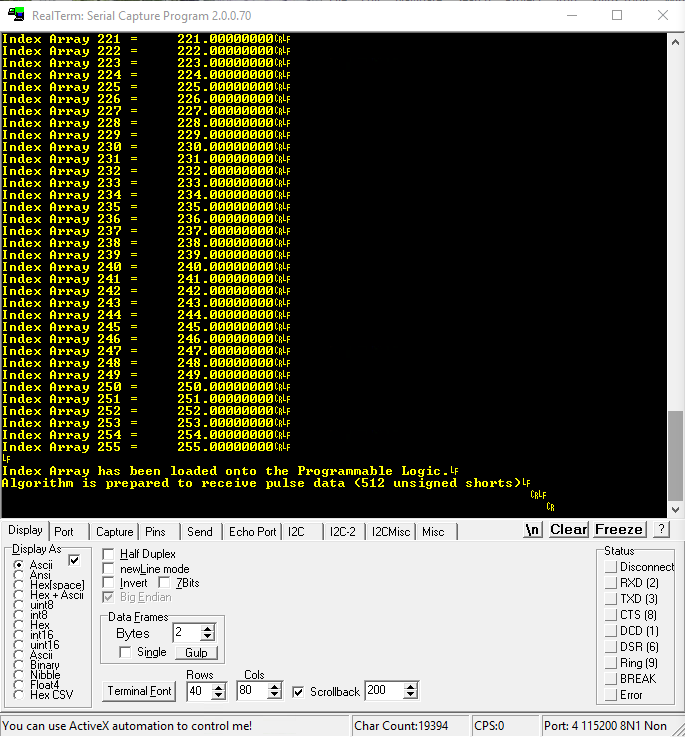
What you've just done is sent a 256-element array of fixed point values in a UDP packet to the ARM processor on the Zynq7010. The processor then wrote that to the block RAM in the PL. So now IndArr is all populated and we are ready to send the streams of waveform data.
3.4.6: Sending the Pulse Data
We're going to use a separate program to send the waveform data to the MicroZed. This program can be found here: send_pulse_array_over_udp.c. If I was more slick, I would have just written one program to send both streams of data. I figured this would be easier for those of you following along.
If you successfully compiled the last program, this one should be equally easy.
> ./gcc -o send_pulse_array_over_udp.o send_pulse_array_over_udp.c
And now we get to the money shot. Issue the command on the first line below and you should see the response on the two lines that follow.
                       > ./send_pulse_array_over_udp.o

                       Sent 512 bytes of pulse data to the GetCentroid algorithm...

                       Calculated centroid:   170.33203125
Congratulations! You've just created a design that does something useful. The array on your computer went through the PS, then to the PL where a centroid was calculated. The PS then read this value from the PL and sent it back via UDP.
Hopefully you've got a deep enough understanding of what's going on to customize this application to meet your own needs. If you're trying to send larger streams of data, you'll need to rewrite the HLS module and the receive callback handler to accomplish this. Basically, you'll have to build up larger arrays in memory and then do larger DMA transfers in order to reduce the overhead the processor suffers from configuring the individual transfer. You can also consider Scatter-Gather.
3.4.7: Reseting the ARM Processor in Case of Trouble
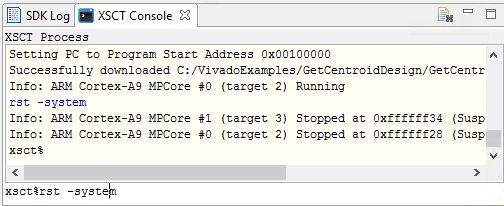
Now, if you follow the instructions I just laid out, everything should have gone smoothly. But if you are starting to muck around with some additions to the code and your program crashes, you'll find that the network interface doesn't quite restart properly if you just reload the .elf file with the above steps. When this was first happening to me, I'd solve the problem by unplugging the USB-mini connector and powering down everything and then plugging it back in. However, there is a cool way to reset everything without doing this!
If you followed all the instructions in this chapter, you should have the XSCT console open at the bottom right of the SDK window. If you want to reset the processor, type rst -system at the console prompt, as in the following screenshot:
PROBLEMS?
Thanks for reading along. If you couldn't get things working, feel free to email me (you can find my email here).
← Previous ... Next →