2.0 Formatting a Micro SD Card with BOOT and ROOT Partitions
Ok, so we've got the UART all connected and ready to go, but we don't have any files to boot from on our Micro SD Card. And even if you do have a pre-partitioned and formatted SD card, you might want to follow along with this just to learn how the partitioning and formatting works. After going through all the steps in this section, we should see our two partitions show up in Ubuntu like so.
There are multiple ways to partition an SD Card (or NAND/NOR flash) to accommodate an installation of Linux. To follow along with the customary way that Raspberry Pi and many other Linux distributions slice things up, we'll make two partitions: a primary BOOT partition and a primary ROOT partition. Here is a short description of what each is for:
- BOOT - this will hold all of the bootloader files, the Linux kernel, plus files that deal with the kernel command line, the device tree, and device configuration
- ROOT - this will contain the Linux root filesystem
There are plenty of ways to partition a disk. Gparted is a great utility to do so, but I'm going to use the command line since we'll be going in that direction to do our embedded development anyway. Since it might not be entirely obvious, I should also mention that all of the following commands are to be carried out on the Ubuntu OS. We won't be entering any commands in the Raspberry Pi console yet.
2.1 Determining Which /dev File is Linked to Your SD Card
One of the first things that I learned about Linux when it comes to computer interfacing—something that I still have to remind myself of to this day—is that every device on your computer or processor is represented as a file in the /dev directory. We have to figure out which file is associated with our micro SD card so that we can unmount it and perform the partioning operations on it.
After inserting your SD card into your reader, type:
$ sudo fdisk -lI inserted a 16 GB micro SD card into my UBS reader, and on my machine, I see an entry that looks like the following in the output:
Disk /dev/sdb: 14.6 GiB, 15653142528 bytes, 30572544 sectors
Units: sectors of 1 * 512 = 512 bytes
Sector size (logical/physical): 512 bytes / 512 bytes
I/O size (minimum/optimal): 512 bytes / 512 bytes
Disklabel type: dos
Disk identifier: 0x00000000
So this means that my SD card is located at /dev/sdb. Yours might show up at /dev/sdc, /dev/sdd, etc.
To gather further information on which file descriptor corresponds to the partition I have to unmount, I type:
$ dmesgThe last few lines show up as:
[   45.590197] sd 3:0:0:0: [sdb] 30572544 512-byte logical blocks: (15.7 GB/14.6 GiB)
[   45.607599]  sdb: sdb1
which tells me that I have to unmount /dev/sdb1. So to follow along, swap out the 'b1' in /dev/sdb1 with whatever letter/numbers corresponds to yours. Note that you could have multiple partitions on the disk that you have to unmount!
2.2 Partitioning Your SD Card
We need to first make sure our SD card is not mounted. To do this, type (remember to replace 'sdLX' with the particular 'sdLX' of your SD card, where L is a letter and X is the number):
$ sudo umount /dev/sdb1$ sudo parted -s /dev/sdb \
$ mklabel msdos \
$ mkpart primary fat32 1M 100M \
$ mkpart primary ext4 100M 100%Note that you may not be able to simply copy and paste the above text because of the line breaks after the "\". Also note that we don't get any valuable response from the above.
We then format the partitions using:
$ sudo mkfs.vfat /dev/sdb1

$ sudo mkfs.ext4 /dev/sdb2
You'll have to press return after the second command above to get the formatting rolling. We can create labels for each partition using:
$ sudo fatlabel /dev/sdb1 BOOT
$ sudo e2label /dev/sdb2 ROOT
Assuming that all went according to plan, let's mount the two drives using a command like this:
$ sudo mount /dev/sdb1 /media/BOOT
$ sudo mount /dev/sdb2 /media/ROOT
In my case, I'm using an Ubuntu 18.04 VM, and I've created two directories called /media/BOOT and /media/ROOT where I'm going to be mounting the BOOT and ROOT partitions, respectively.
2.3 Determine Partition UUID's
Later, when we manually install and configure our root filesystem (we'll pull it from NOOBS just as an example of how to install an uncompressed root filesystem in the ROOT partition), we'll need the UUID's for the two partitions. To find these out, type:
$ sudo blkidThe output will contain a large number of entries. The only ones we care about are those corresponding to the /dev/sdLX entries we used above when partitioning the SD card. For instance, on my system, the output contains the following two lines:
/dev/sdb1: SEC_TYPE="msdos" LABEL="BOOT" UUID="2A3B-80F8" TYPE="vfat" PARTUUID="8eab03bd-01"
/dev/sdb2: LABEL="ROOT" UUID="0a6e32fb..." TYPE="ext4" PARTUUID="8eab03bd-02"
Note that I've chopped off most of the digits from the UUID of the ROOT partition since we're only concerned with the PARTUUID. We have:
- BOOT - PARTUUID=8eab03bd-01
- ROOT - PARTUUID=8eab03bd-02
We'll be using these PARTUUID's later when we modify /etc/fstab and /BOOT/cmdline.txt to get our root filesystem up and running.
2.4 Downloading Bootloader Files
Now we can finally start populating the BOOT partition with the files needed to boot Linux up. These files are available at https://https://github.com/raspberrypi/firmware. To clone the repo (you may have to do an apt install git if you don't have it already), type:
$ cd ~
$ mkdir RaspberryPi
$ cd RaspberryPi
$ git clone https://https://github.com/raspberrypi/firmware.git
We are only concerned with the files in the boot/ directory of the repository. While we don't need all of many included files, many of which are intended for the various other flavors of Raspberry Pi, we'll just copy them all to the BOOT partition of our SD card.
$sudo cp -r firmware/boot/* /media/BOOT/2.5 Creating Configuration Files to Enable Console on the UART
By default, with the binary files we've included on the BOOT partition, nothing will be printed out over the UART when Linux first boots up. To make this happen, we need to enable the UART and the console by passing the proper command-line parameters to the kernel and specifically enabling the UART through the device tree.
2.5.1 Creating a cmdline.txt file
The way that the Raspberry Pi firmware determines which device to use for the console is via a file called cmdline.txt. We have to create a cmdline.txt to give the proper boot arguments to the kernel. So open up a file called /media/BOOT/cmdline.txt (or whatever the path is to the BOOT partition on your SD card) in whatever editor you'd like, and add this line
dwc_otg.lpm_enable=0 console=serial0,115200 console=tty1 root=PARTUUID=416bf1fe-02 rootfstype=ext4 elevator=deadline fsck.repair=yes rootwaitThe portions of this line that we care about now are the two "console" entries. The first: console=serial0,115200 tells Linux that the console should use the primary UART at 115,200 baud. The second: console=tty1 says that the proper device entry for the serial port is at /dev/tty1.
2.5.2 Creating a config.txt file
We also have to create a config.txt file to allow certain peripherals to be loaded. In this case, we want to enable the primary UART. So next, create a file called /media/BOOT/config.txt and add this one line:
enable_uart=12.6 Booting Up...With No Root Filesystem
Now we should have all the right files in the BOOT partition on the SD card for the kernel to boot up. If you have everything configured and wired up correctly, turn on the power and you should see the following after a few seconds:

It looks good to start! We've got kernel version 4.19.57 loading and the hardware is being recognized at each step. However, you'll notice things don't look so great once we get to the end of the boot sequence! Look at these lines:
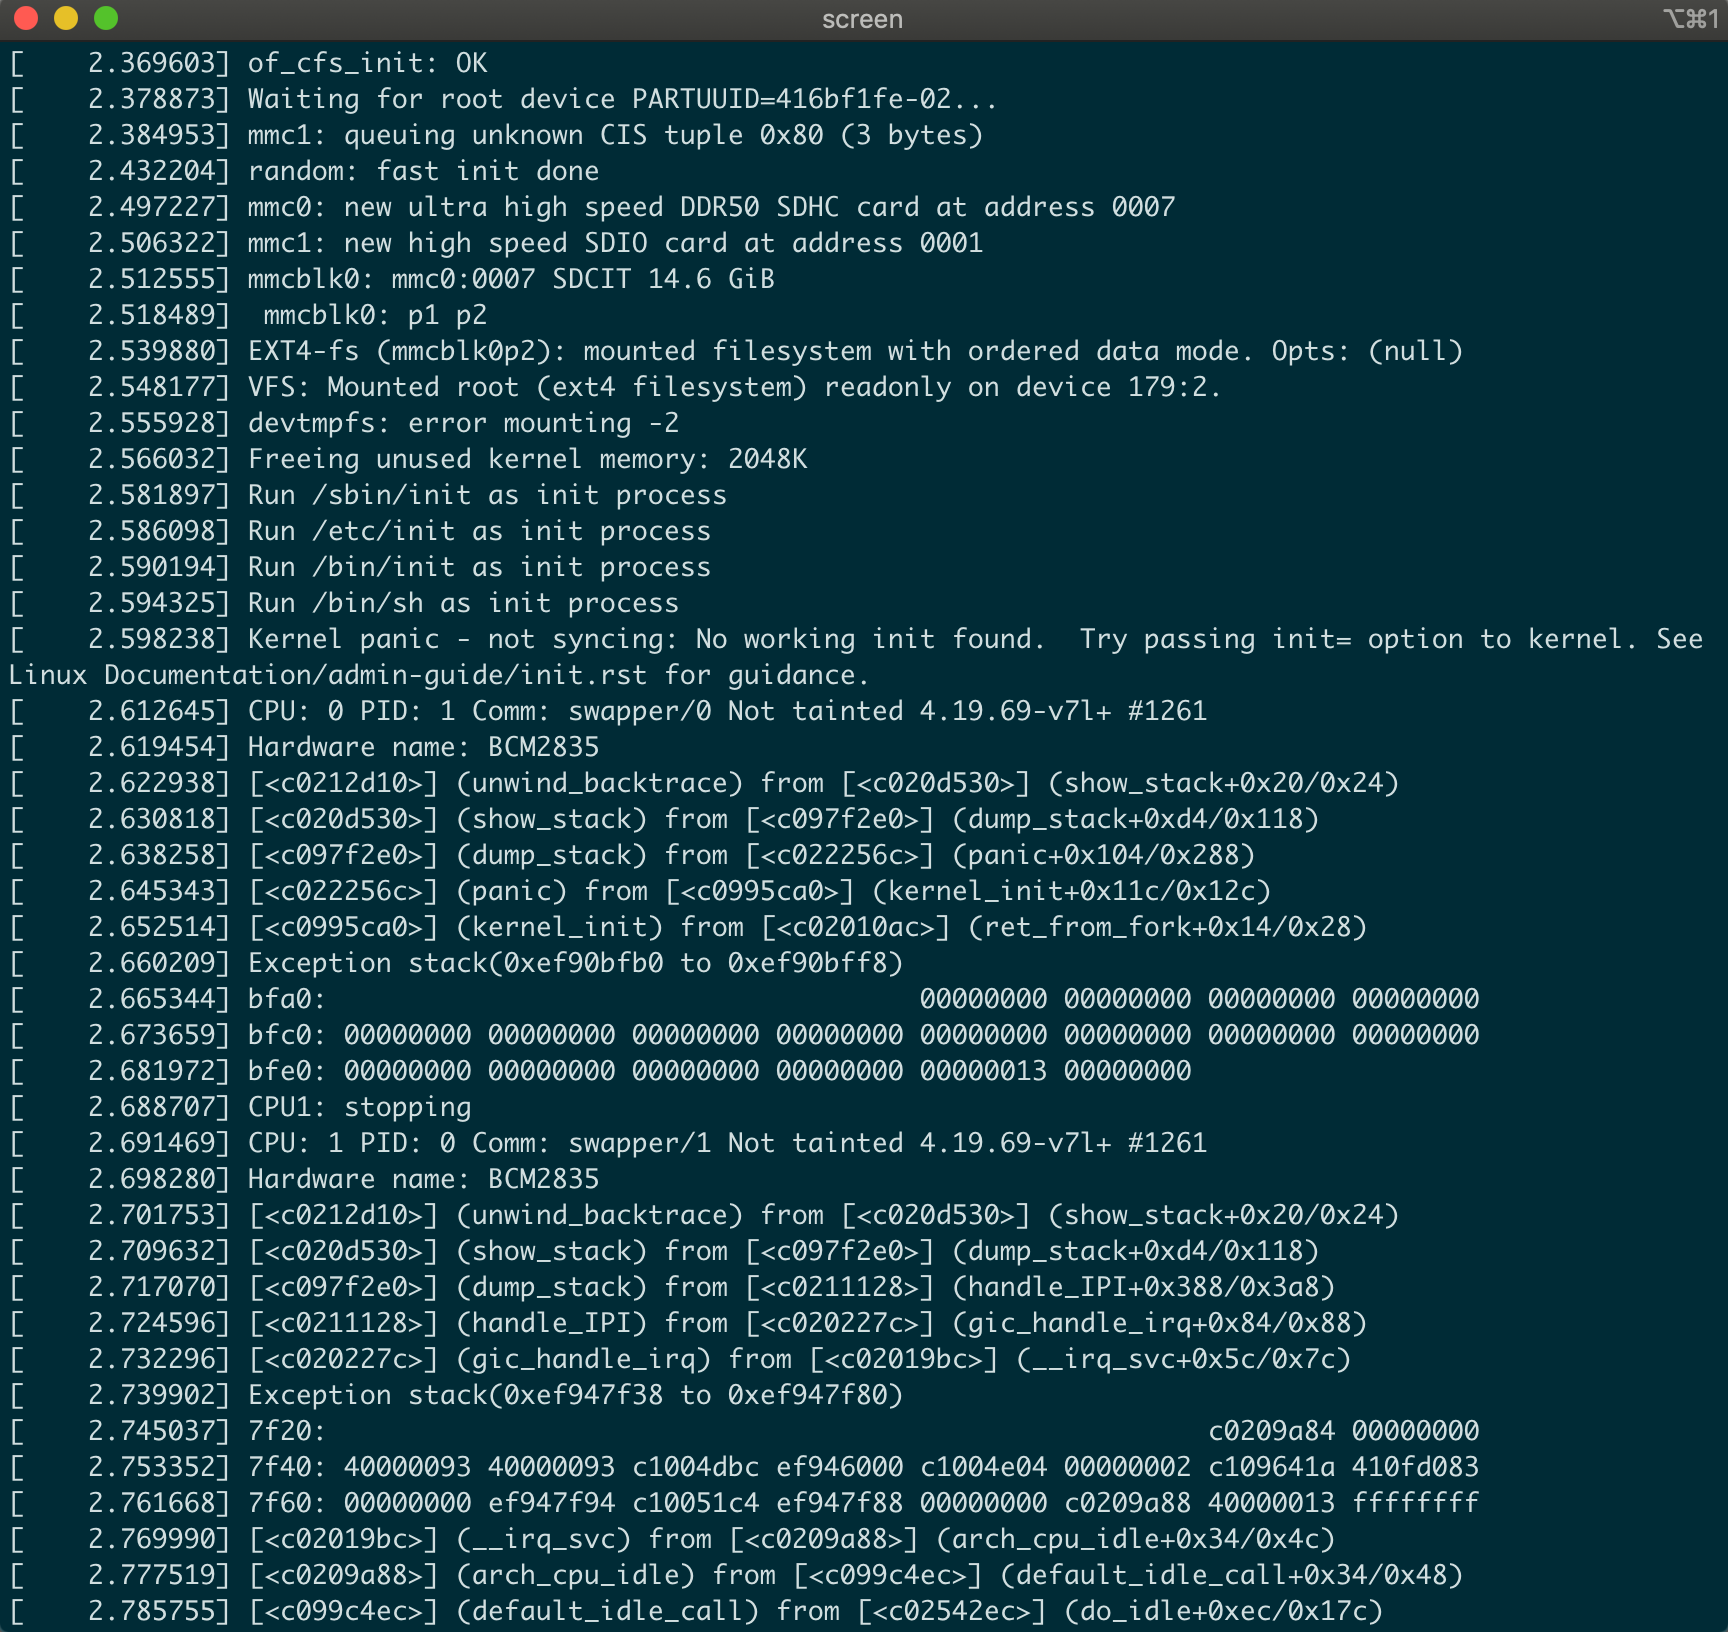
The most important ones that tells us what happened are: devtmpfs: error mounting -2 and Kernel panic - not syncing: No working init found. Kernel panic...that can't be good, right?
What is going on here? Well, The kernel is telling us that it was able to find the SD card at /dev/mmcblk0, and it knows about the two partitions /dev/mmcblk0p1 (the BOOT partition) and /dev/mmcblk0p2 (the ROOT partition). But when it tried to mount the ext4 filesystem that should be in the ROOT partition, it found nothing. This makes sense since we haven't installed a root filesystem yet on the card.
I apologize for leading you to this error, but I've encountered it many times while developing embedded systems. Sometimes the kernel just can't seem to find the root filesystem, and this is a typical output when it happens. In the next section, we'll install an uncompressed root filesystem and show what it looks like when things boot up happily.
← Previous ... Next →