7.0 Building Our Linux Image
In this section, we'll actually build our minimal Linux image. A bit of advice: go grab a coffee or a beer after you get things going. If you're into kambucha, you can do that too, although I'm not sure I get the whole kambucha thing. The point is: even with a 12-core processor, it still takes about 40 minutes to finish the build we just configured.
7.1 Using Bitbake to Build Our Kernel and Root Filesystem
Bitbake is a very, very powerful tool that has a lot of different command-line options. But for the most part, you can think of bitbake as simply operating on a recipe in the following fashion: bitbake [recipe-name]. As long as bitbake knows how to find the recipe you specify (which it does through the bblayers.conf and layer.conf files you've created), you should be good.
The recipe that we created in our custom layer is called "rpilinux-image" (the file that holds the recipe is rpilinux-image.bb). Assuming that we've set up our config files correctly, bitbake should be able to find things if we type (I'm throwing in the "source oe-init-build-env" part in there just because I know how easily something like that can cause a ton of wasted minutes or hours):
$ cd ~/Yocto/poky
$ source oe-init-build-env
$ bitbake rpilinux-image
After you type the last command, the prompt should spit out something like the following:
Parsing recipes: 100% |###########################################################################################################| Time: 0:00:24
Parsing of 802 .bb files complete (0 cached, 802 parsed). 1328 targets, 63 skipped, 0 masked, 0 errors.
NOTE: Resolving any missing task queue dependencies

Build Configuration:
BB_VERSION           = "1.44.0"
BUILD_SYS            = "x86_64-linux"
NATIVELSBSTRING      = "ubuntu-18.04"
TARGET_SYS           = "aarch64-poky-linux"
MACHINE              = "raspberrypi4-64"
DISTRO               = "poky"
DISTRO_VERSION       = "3.0"
TUNE_FEATURES        = "aarch64 cortexa72 crc crypto"
TARGET_FPU           = ""
meta
meta-poky
meta-yocto-bsp       = "zeus:24046332599cc528834df515a90babc83b7cd570"
meta-raspberrypi     = "zeus:cee2557dc872ddaf721e6badb981c7772503f8ea"
meta-rpilinux        = ""

NOTE: Fetching uninative binary shim from http://downloads.yoctoproject.org/releases/uninative/2.7/x86_64-nativesdk-libc.tar.xz;sha256sum=9498d8bba047499999a7310ac2576d0796461184965351a56f6d32c888a1f216
Initialising tasks: 100% |########################################################################################################| Time: 0:00:01
Sstate summary: Wanted 862 Found 0 Missed 862 Current 0 (0% match, 0% complete)
NOTE: Executing Tasks
NOTE: Setscene tasks completed
If you see some "unknown" entries listed to meta-rpilinux, don't fear. We didn't create a git repo in that directory. The files in the .git directory is where bitbake pulls the information that gets put there. If you look at the meta-raspberrypi or meta-yocto-bsp entries above, you'll see that they are using the "zeus" branch. If we were to do a git init in the meta-rpilinux directory, it would list the master branch followed by a very long string of characters.
7.2 Finding the Deployed Image and Boot Files
Assuming everything went well, Yocto stores the output products of the build in the poky/build/tmp directory. There are plenty of useful items in this directory, some of which we'll cover later. But for now, we'll focus on the directory ~/Yocto/poky/build/tmp/deploy/images/raspberrypi4-64.
If you do an ls of that directory, you'll see a ton of crazy-looking file names. Luckily, most of them are aliases that the people at Yocto created to make things easier on us. The three most important files in this mess are going to be:
- bcm2711-rpi-4-b.dtb : this is an alias for the device tree blob that Yocto built for us. We'll have to copy this to the BOOT partition in order to get the system to configure the hardware correctly.
- Image : this is an alias to the Linux kernel that we just created. If we do a file [Filename aliased by "Image"] command, we can see that this is an MS-DOS executable. If we examine it the way we did in Section 5.4.3, we'll see that it's intended for a 64-bit ARM architecture.
- rpilinux-image-raspberrypi4-64.tar.bz2 : this is an alias to the compressed root filesystem we just created. Take a look at the actual file and notice how small it is! The core-minimal-image has a very small footprint, which can be very useful for embedded systems.
And there is also one very important—but mislabeled—directory.
- bcm2835-bootfiles : this directory contains the boot firmware that the Pi needs to get things started. If you look inside, you'll see files like start*.elf, fixup*.dat, config.txt, and cmdline.txt. Remember these files? These are the ones that we downloaded in Section 2.4 when we were trying to get the Raspberry Pi 4 to boot up! The good news is that the Yocto recipe downloaded/populated them all for us from an archive on github; the bad news is that the directory is mislabeled. The bcm2835 in the directory name is the SoC that was used on previous generations of the Raspberry Pi 4. The bcm2711 is the SoC that we have on the Raspberry Pi 4. Confusing, yes?
If you compare this directory with the one we used in Section 2.4, you'll also notice that the overlays directory is missing. This directory may be important to you depending on what type of peripherals you're trying to use on the board.
In the next section, we'll explore the recipe that was used to download these files and copy them to the deploy directory. We'll correct the directory naming error in the recipe by making a recipe in our own layer, and also instruct bitbake to copy the overlays directory for us.
7.3 Creating Our Own bmc2835-bootfiles.bb.append Recipe to Install Overlays and More
Ok, so just to summarize, we want to correct the improper name of the bcm2835-bootfiles directory and add the device tree overlays to that directory so we can more easily do a copy of all the bootloader files to the BOOT partition of our SD card after we're done with our build. In order to do that, we're going to create a bcm2835-bootfiles.bbappend file in our own layer. Using .bbappend files is a much better practice than directly editing .bb files in somebody else's layer for a whole host of reasons, and it's one of the key underpinnings of Yocto and BitBake.
7.3.1 Examining the Original bcm2835-bootfiles Recipe
First of all, we need to find the recipe that installed the bcm2835-bootfiles directory. To do that, we'll use the find command like so:
$ cd ~/Yocto/meta-raspberrypi
$ find ./ -name "bcm2835-bootfiles.bb" -print
./recipes-bsp/bootfiles/bcm2835-bootfiles.bb
The recipe is in the recipes-bsp directory, which makes sense since that's the board support package directory for the RPi. After using Yocto for awhile, you'll be able to figure that out without having to dig around. Let's take a look at that file.
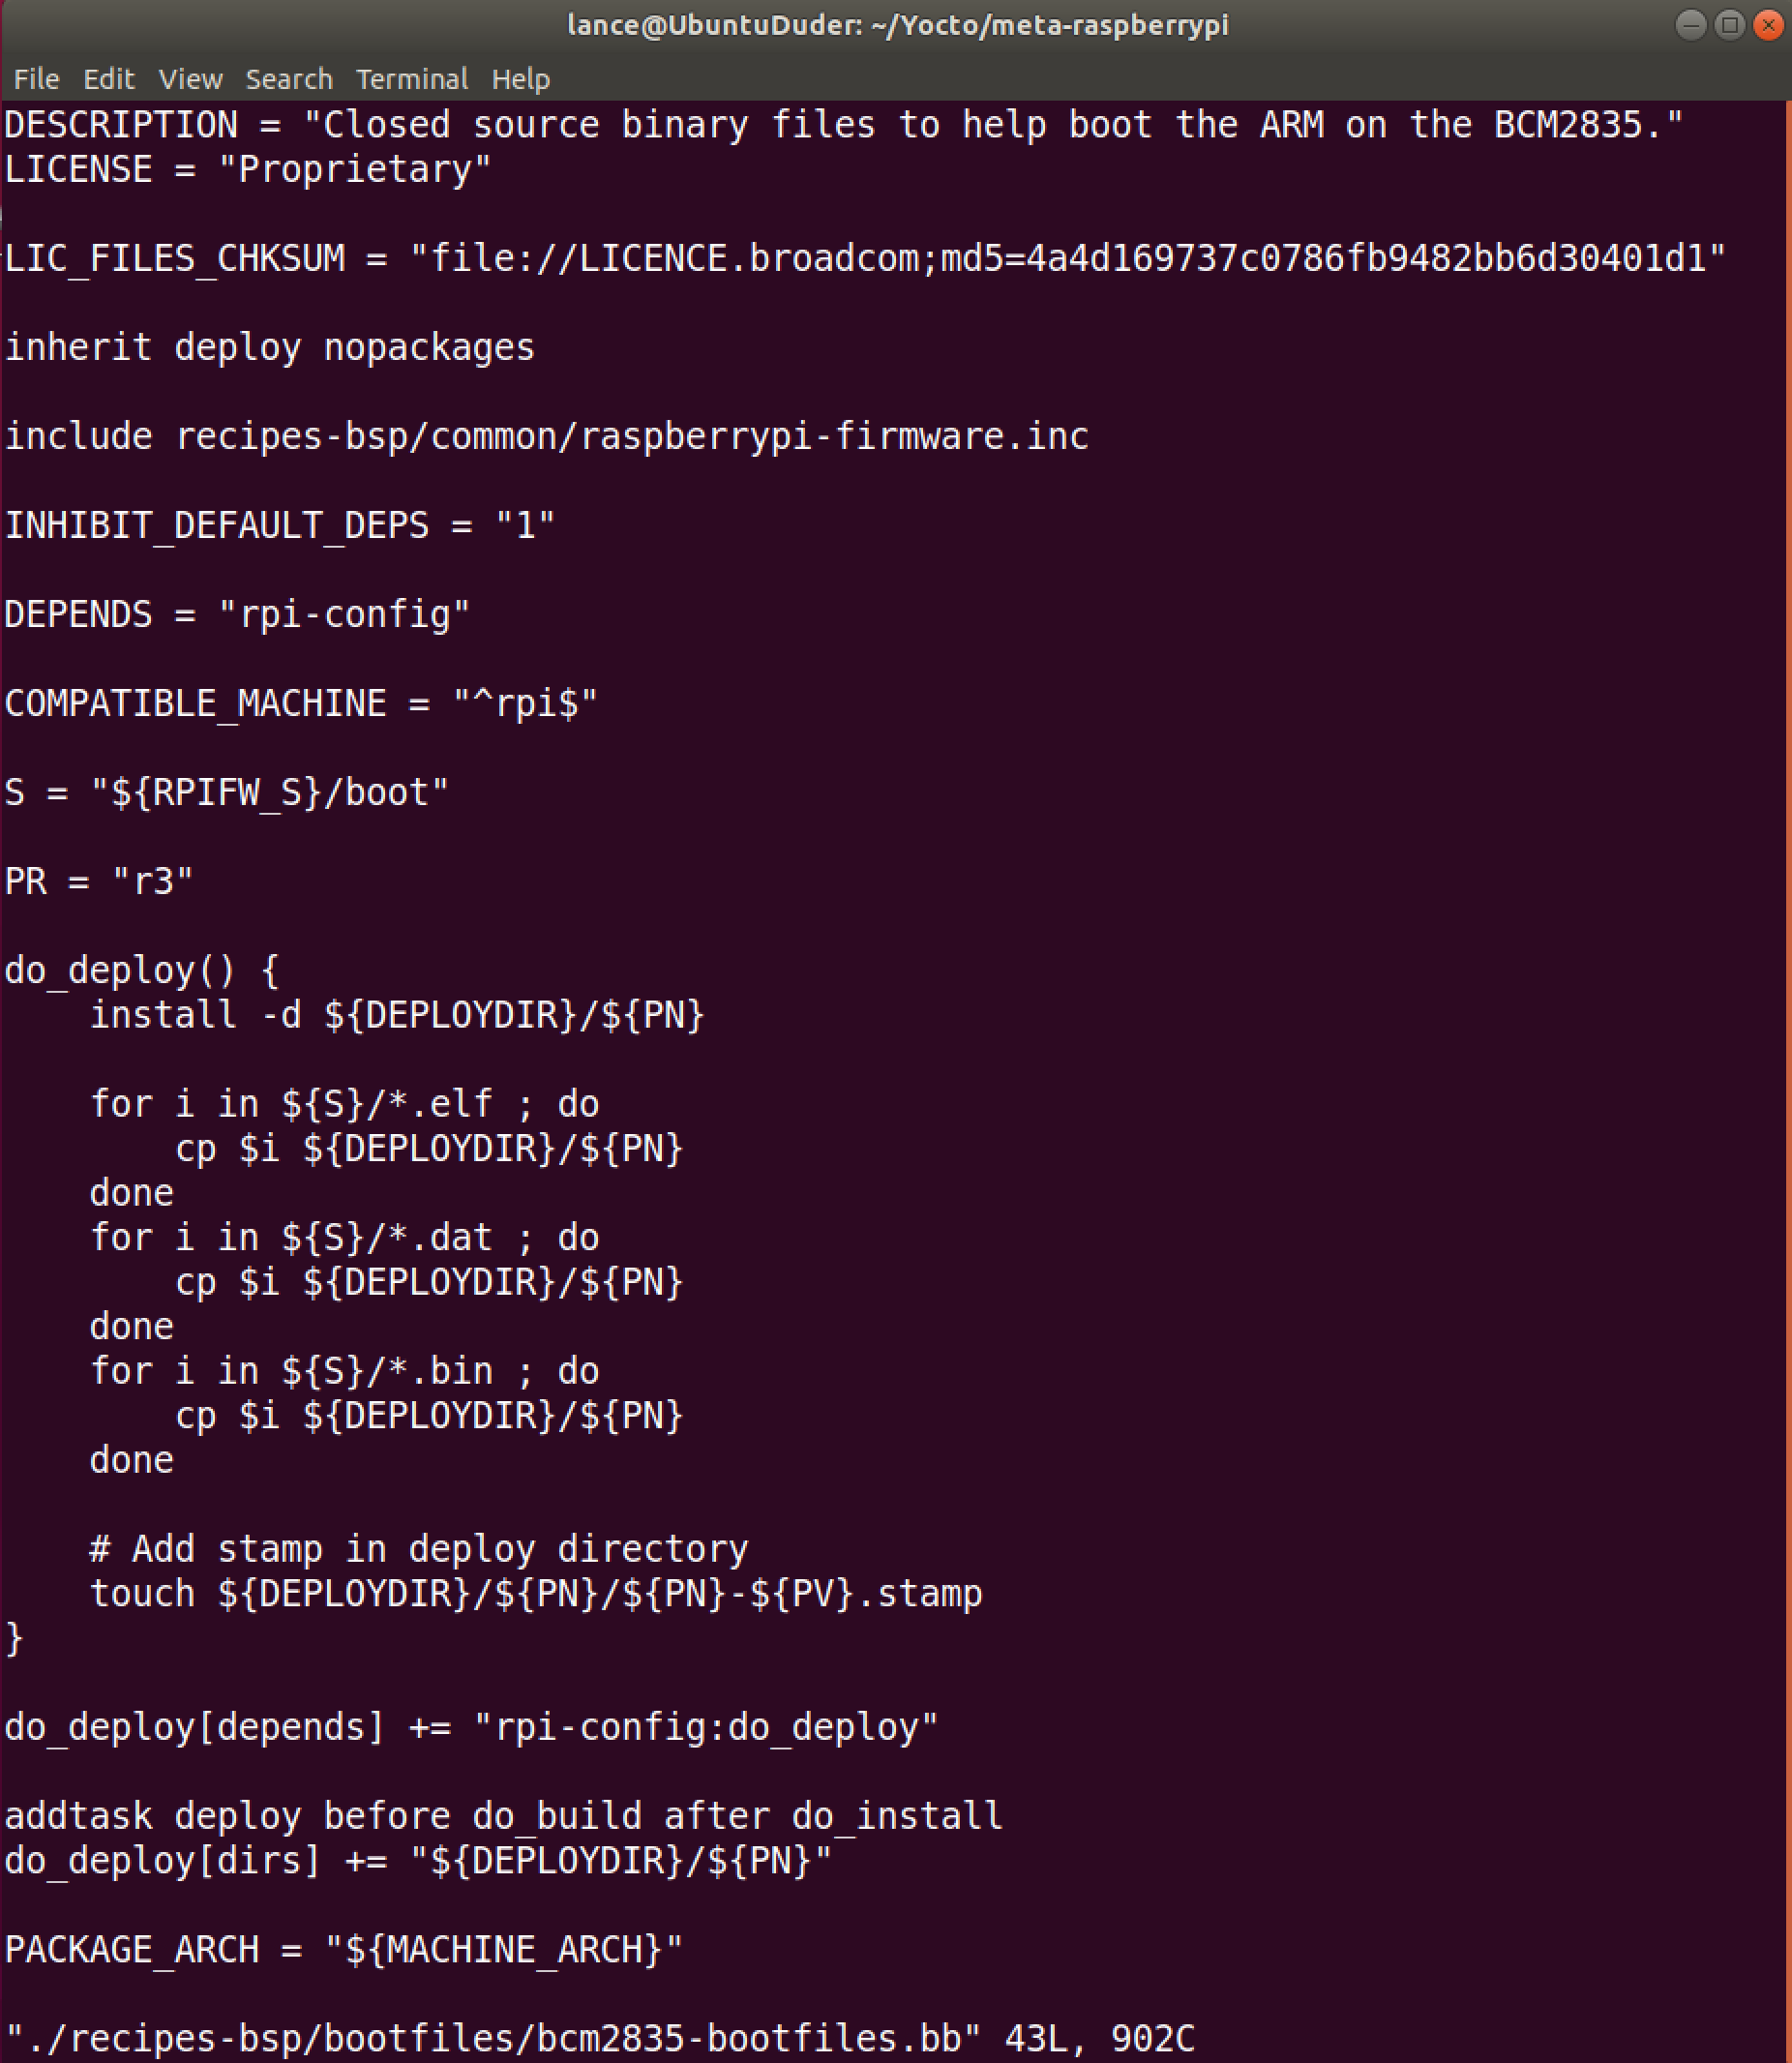
The line include recipes-bsp/common/raspberrypi-firmware.inc tells bitbake to parse the raspberrypi-firmware.inc file and insert the file contents right there. It's another recipe, so it's obviously pretty important. We need to have a look at the latter to understand what's happening there.
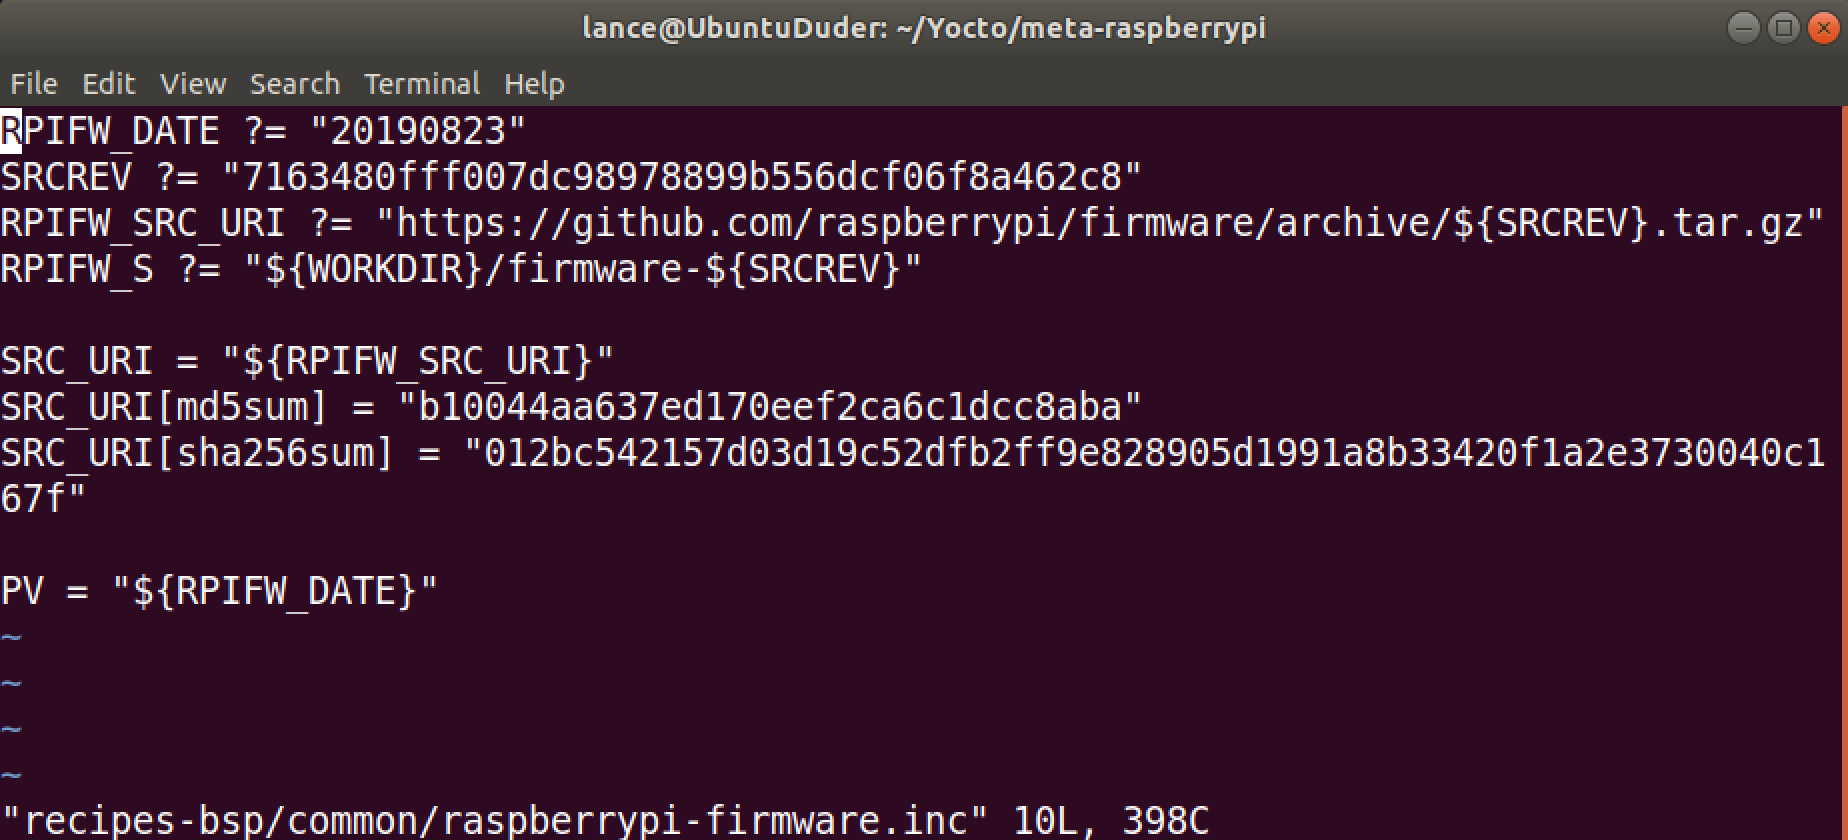
The second and third lines combine together to create a URL to a .tar.gz file: https://github.com/raspberrypi/firmware/archive/7163480fff007dc98978899b556dcf06f8a462c8.tar.gz. Combined with the SRC_URI directive below, this is telling bitbake where to pull the firmware from. You can go ahead and enter that URL into a browser and you'll see it downloads a compressed version of the boot firmware just like the one we downloaded in Section 2.4.
But where does bitbake store the decompressed files? Well, the S entry (typically following an underscore) denotes "source", so the RPIFW_S shows us where the source is being stored. We just need to figure out what path WORKDIR represents. We'll do just that in the next subsection.
7.3.2 Determining BitBake Environmental Variables with the "-e" Argument
A very handy argument to bitbake is the -e argument. You use it just like you would a normal bitbake run: bitbake -e [recipe name] This prints a ton of important variables that bitbake uses during a build. If we do a grep on the results, we can see what values those variables have. For instance, with our bcm2835-bootfiles.bb recipe (I'm including the source command just because I know it always got me at first!):
$ cd ~/Yocto/poky
$ source oe-init-build-env
$ bitbake -e bcm2835-bootfiles | grep ^WORKDIR=
WORKDIR="~/Yocto/poky/build/tmp/work/raspberrypi4_64-poky-linux/bcm2835-bootfiles/20190823-r3"
(note the ^ means that it's at the start of a line).
So there we see where our WORKDIR is. Adding that together with the other variables in raspberrypi-firmware.inc, we see that RPIFW_S=~/Yocto/poky/build/tmp/work/raspberrypi4_64-poky-linux/bcm2835-bootfiles/20190823-r3/firmware-7163480fff007dc98978899b556dcf06f8a462c8. Note we could have also just done a bitbake -e bcm2835-bootfiles | grep RPIFW_S to find this.
Lastly, we see that the S directory for this recipe is (either by doing a bitbake -e or piecing together ourselves): ~/Yocto/poky/build/tmp/work/raspberrypi4_64-poky-linux/bcm2835-bootfiles/20190823-r3/firmware-7163480fff007dc98978899b556dcf06f8a462c8/boot. If you cd into that last directory, you'll see the boot files! And you'll see the overlays directory we were searching for. So we have already have all the .dtbo files we need, we just need to add some instructions to a recipe in our own layer to copy them.
7.3.3 Creating the bcm2835-bootfiles.bbappend Recipe
In our meta-rpilinux layer, let's create a directory structure that mimics the one where the bcm2835-bootfiles.bb file is stored in the meta-raspberrypi layer is stored.
$ cd ~/Yocto/meta-rpilinux
$ mkdir -p recipes-bsp/bootfiles
$ cd recipes-bsp/bootfiles
$ vi bcm2835-bootfiles.bbappend
Note that the .bbappend file must have the same exact prefix as the .bb file we're trying to modify! By prefix, I mean anything before the .bb extension. So if your .bb file is called minimal-core-image_v2.0.bb, your .bbappend file should be called minimal-core-image_v2.0.bbappend.
The contents of our bcm2835-bootfiles.bbappend file should be the following (you can download a copy here: bcm2835-bootfiles.bbappend):
SUMMARY = "Recipe to create bcm2711-bootfiles directory in the image deploy directory that contains overlays and trimmed version of config.txt (also corrects improper naming convention that uses bcm2835, which is an older SoC)."

BCM2711_DIR = "bcm2711-bootfiles"

do_after_deploy() {
    install -d ${DEPLOY_DIR_IMAGE}/${BCM2711_DIR}

    for i in ${S}/*.elf ; do
        cp $i ${DEPLOY_DIR_IMAGE}/${BCM2711_DIR}
    done
    for i in ${S}/*.dat ; do
        cp $i ${DEPLOY_DIR_IMAGE}/${BCM2711_DIR}
    done

    cp -r ${RPIFW_S}/boot/overlays/ ${DEPLOY_DIR_IMAGE}/${BCM2711_DIR}/overlays

    # Make a simple config.txt
    touch ${DEPLOY_DIR_IMAGE}/${BCM2711_DIR}/config.txt
    echo 'kernel=kernel_rpilinux.img' >> ${DEPLOY_DIR_IMAGE}/${BCM2711_DIR}/config.txt
    echo 'arm_64bit=1' >> ${DEPLOY_DIR_IMAGE}/${BCM2711_DIR}/config.txt
    echo 'enable_uart=1' >> ${DEPLOY_DIR_IMAGE}/${BCM2711_DIR}/config.txt

    # Make a simple cmdline.txt
    touch ${DEPLOY_DIR_IMAGE}/${BCM2711_DIR}/cmdline.txt
    echo 'dwc_otg.lpm_enable=0 console=serial0,115200 console=ttyS0 root=/dev/mmcblk0p2 rootfstype=ext4 elevator=deadline fsck.repair=yes rootwait' >> ${DEPLOY_DIR_IMAGE}/${BCM2711_DIR}/cmdline.txt

}

addtask after_deploy before do_build after do_install do_deploy
The DEPLOY_DIR_IMAGE variable is very useful for recipes since that's where the rpilinux-image output products (or whatever target you're specifying) will go. Again, we can simply do a bitbake -e rpilinux-image | grep ^DEPLOY_DIR_IMAGE to see that it has the value of DEPLOY_DIR_IMAGE="~/Yocto/poky/build/tmp/deploy/images/raspberrypi4-64" like we'd expect.
After we've created this file, we can do another bitbake rpilinux-image. But note it's always good practice to do a bitbake -c cleanall rpilinux-image before we do so. The latter will remove all output files, shared state cache, and downloaded source files for the target.
This time, the build should only take a few seconds since the vast majority of the recipes don't need to be repeated.
IMPORTANT: Bitbake is pretty good about recognizing changes to recipes and any other type of metadata. However, it does not know if we've manually deleted output files from the DEPLOY_DIR_IMAGE directory!
If you accidentally deleted output files or directories, one trick is to just modify the recipe that generated the output slightly, run bitbake, change the recipe back to the correct form, and run bitbake again.
7.4 Finding the Uncompressed Root Filesystem We Just Built
It can be useful to have an uncompressed version of the compressed root filesystem in our deploy directory. This is located in the directory: ~/Yocto/poky/build/tmp/work/raspberrypi4_64-poky-linux/rpilinux-image/1.0-r0/rootfs.
You should cd into that directory and have a look. If you do a du -h -d 1 of rootfs, you'll see it only takes up 19MB!! It's extremely bare bones. You may be thinking that's not great since all the typical tools like python and gcc won't be available on the board, and that's fair. But we can easily include those in our next build with just a few Yocto tricks.
Again, this tutorial is for embedded designers who want to have the most lightweight system possible. You can pick whatever applications you want to include on your boards a la carte, which is why Yocto is such a great thing.
← Previous ... Next →