3.0 Installing a Root Filesystem in the ROOT Partition
Before we dive into Yocto, I'm going to go through the exercise of installing a pre-built root filesystem on the ROOT partition to show the basic steps of how this is done and also illustrate some of the errors you might see pop up if you're having trouble. If you want to skip this section and go straight to the one where we generate our own root fs with Yocto, I won't blame you.
We're going to go with the root filesystem included in the NOOBS operating system. You should be able to get it from this page. At the time of writing (2019-09-30), I'm going to be using Version 3.2.1, but you should be able to follow along with the latest version.
3.1 Extracting root.tar.xz from Raspbian in the NOOBS package
Once you've downloaded the NOOBS .zip file, I recommend doing some exploration of the contents after you unzip it. It can be very informative to dig through all of the files that are included in the NOOBS distribution and see how they set things up.
The instructions for NOOBS tell you to just set up one partition on your SD card, unlike what we've got set up on our card. This is the BOOT partition that will be used when the Raspberry Pi boots up. However, you'll note that in the files you are supposed to copy over, shown below,
we don't see a true Linux kernel; only the device tree binaries to support the hardware on all versions of the Raspberry Pi and some other .img files. What you see in this top-level directory is some executable linker format (.elf) files that are used to run an OS installer.
This page, while outdated, provides a good explanation of what each one of those files does and how the installer works. We're not going to be using the installer. Instead, we're just going to steal the compressed root filesystem at [Path to NOOBS Directory]/os/Raspbian_Full/root.tar.xz and install it on the ROOT partition of our SD card.
3.2 Decompressing root.tar.xz on the ROOT Partition
Assuming you've taken the SD card out of the Raspberry Pi, popped it back in your SD card reader, and mounted it at /media/ROOT, do the following steps:
$ sudo cp [Path to NOOBS Directory]/os/Raspbian_Full/root.tar.xz /media/ROOT/
$ tar xvf root.tar.xz
Make sure you don't try to decompress on a Windows or Mac host since you'll get errors like "" due to the fact that the symbolic links don't work on FAT or NTFS filesystems. You'll have to decompress on the ext4 filesystem on the ROOT partition (or another ext[N] filesystem if you want to go that route).
There are a lot of files to be decompressed and SD cards aren't the fastest of technologies, so it may take awhile before it's done. I think it took about 20 minutes to decompress on my system with the USB card reader attached to the Ubuntu VM.
When all is said and done, you should see a nice looking root filesystem! This is not to be confused with the Linux kernel source that you build a kernel and root fs from. It's a complete Linux filesystem that gets mounted by the kernel so that Linux can do what it does. I don't mean to insult anyone's intelligence by pointing this out, but I do remember being a bit confused between the two sets of files when I first started out.
3.3 IMPORTANT: Booting With an Incorrect PARTUUID or Using root=/dev/mmcblk0p2
Before we set everything in the root filesystem up to do a proper boot, I want to cover an error that I ran into while I was trying to get this root filesystem working. The forums I found related to the error message I was seeing didn't exactly provide the best instructions on how to fix it, so I figure I'll cover it here.
If you try to boot up the system right now, you'll get this error message: Cannot open access to console, the root account is locked. Here's exactly what the surrounding boot messages look like:
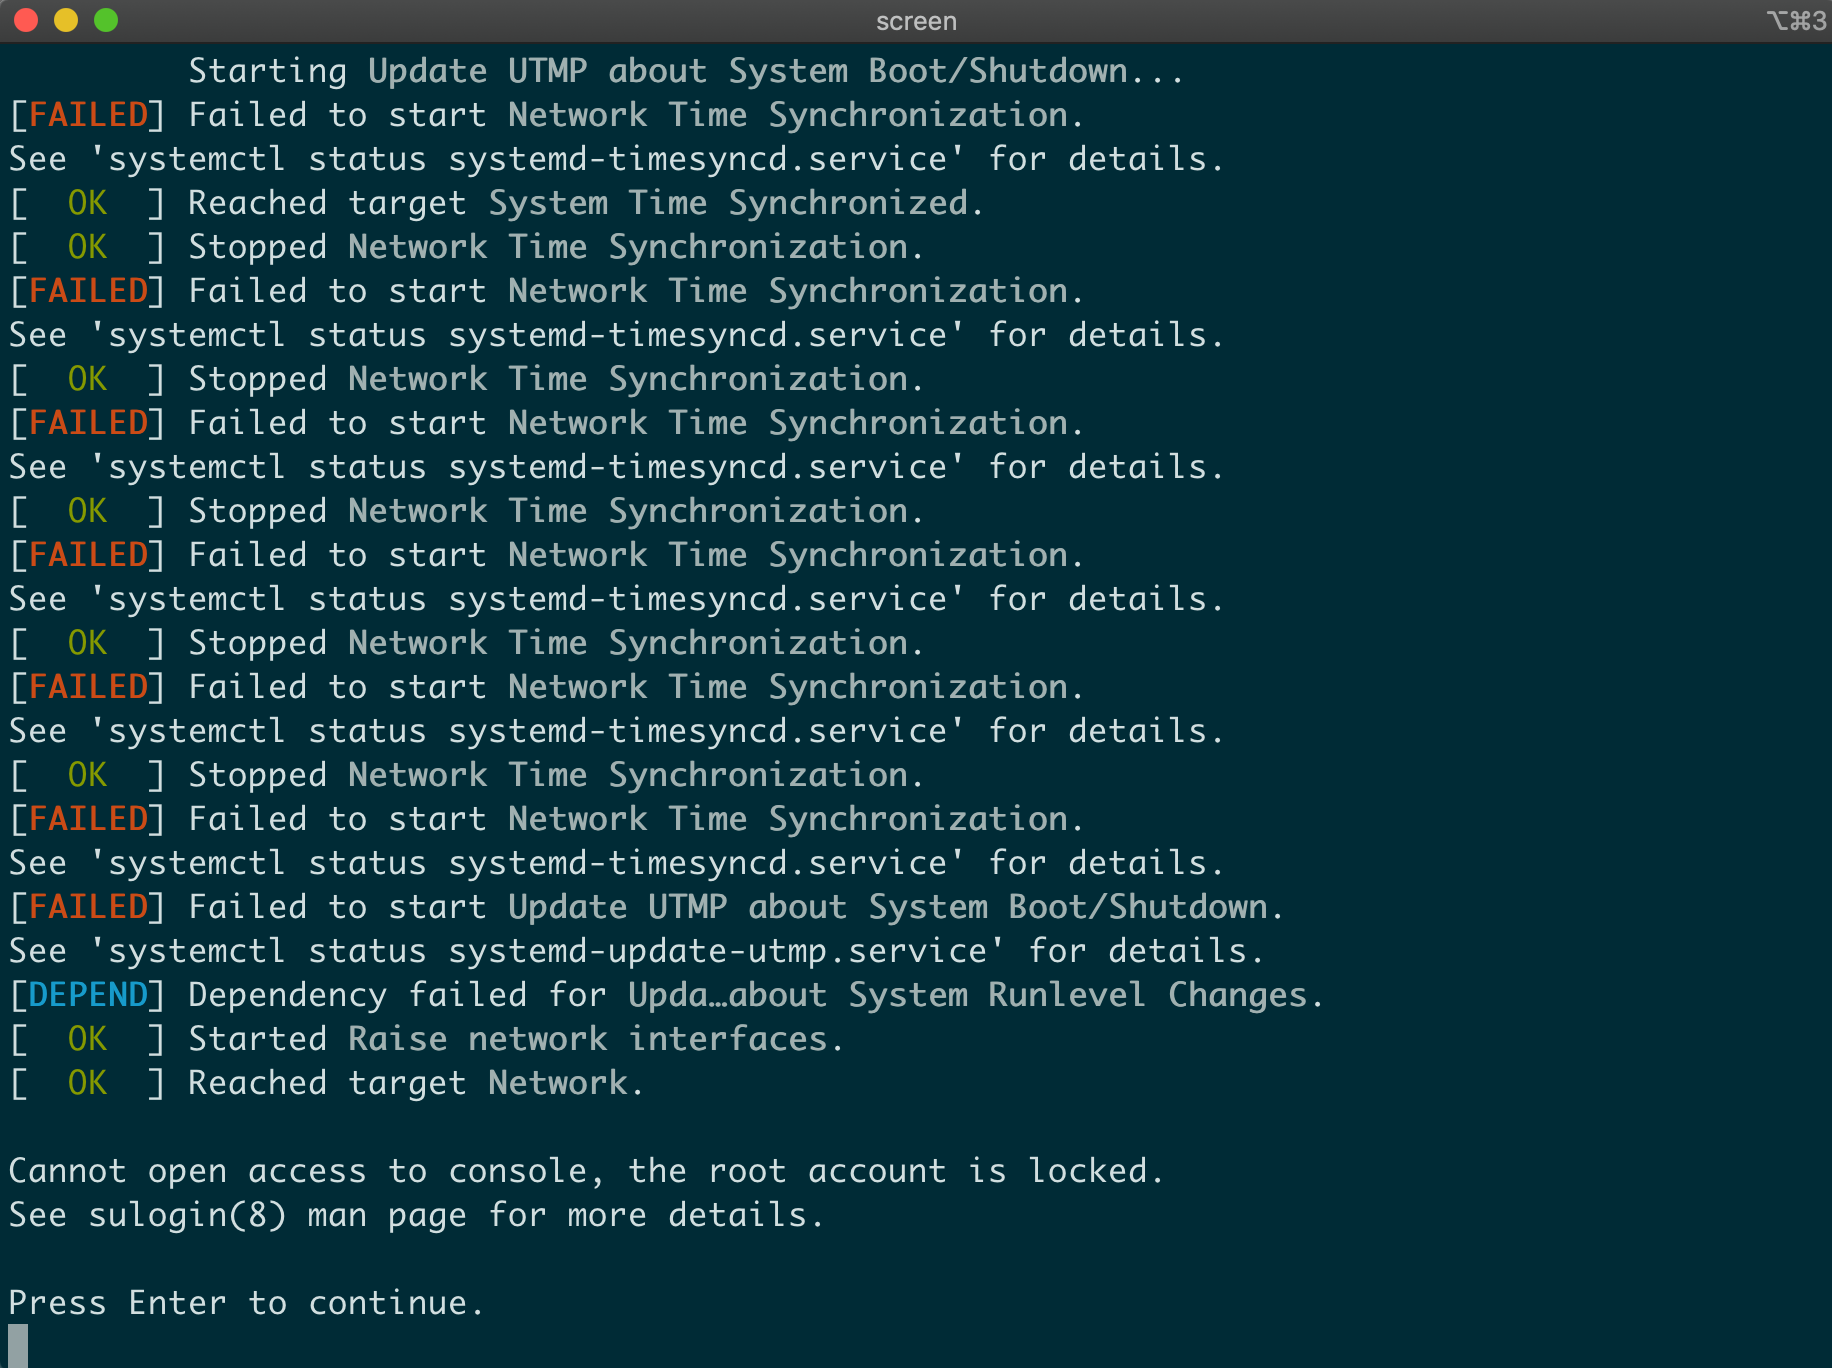
I was a bit confused by what was going on here, because even though it looked like the kernel had found the root filesystem and mounted it properly in some aspects, the fact that none of the systemd applications were loading properly seemed to indicate otherwise.
Based on some quick testing, I figured out two conditions will lead to this:
- In cmdline.txt, the line contains the wrong PARTUUID in root=PARTUUID=XXXXXXXX-XX
- In /etc/fstab, the wrong PARTUUID's are assigned to the two primary partitions
In the following subsection, I'll show a method to get things booting up properly by using the right PARTUUID.
3.3 Fixing the PARTUUID's to Match Up
In the previous chapter, I showed how to obtain the PARTUUID's for our BOOT and ROOT partition from the Ubuntu VM using the blkid command. As a reminder, here is what I had for my two partitions:
/dev/sdb1: SEC_TYPE="msdos" LABEL="BOOT" UUID="2A3B-80F8" TYPE="vfat" PARTUUID="8eab03bd-01"
/dev/sdb2: LABEL="ROOT" UUID="0a6e32fb..." TYPE="ext4" PARTUUID="8eab03bd-02"
We have to ensure that our cmdline.txt file has the proper root=PARTUUID entry, which looks like:
dwc_otg.lpm_enable=0 console=serial0,115200 console=tty1 root=PARTUUID=416bf1fe-02 rootfstype=ext4 elevator=deadline fsck.repair=yes rootwaitThen, on the ROOT partition, we also have to ensure that the partition UUIDs in /etc/fstab match up with this since those are the ones used to automount the partitions. Opening up fstab in vi using sudo vi /media/ROOT/etc/fstab, we change the PARTUUID's so the file looks like the following:
proc                    /proc           proc    defaults          0       0
PARTUUID=416bf1fe-01    /boot           vfat    defaults          0       2
PARTUUID=416bf1fe-02    /               ext4    defaults,noatime  0       1
To be clear, it's not just that all three sets of entries are consistent. The PARTUUID's returned by the blkid command are the ones that are correct. So make sure the ones in cmdline.txt and /etc/fstab of the root filsystem agree with those.
Using the partition UUID's isn't the most straightforward way to go, but I wanted to cover it here in case you find yourself working with a Linux setup that uses them in /etc/fstab. When we actually build our own root FS with Yocto in Section 8, we'll use the mmcblk device files instead of the partition UUID's.
3.4 Booting Up with a Working Root FS
After getting all the above correct, when we boot up, we should see the following:
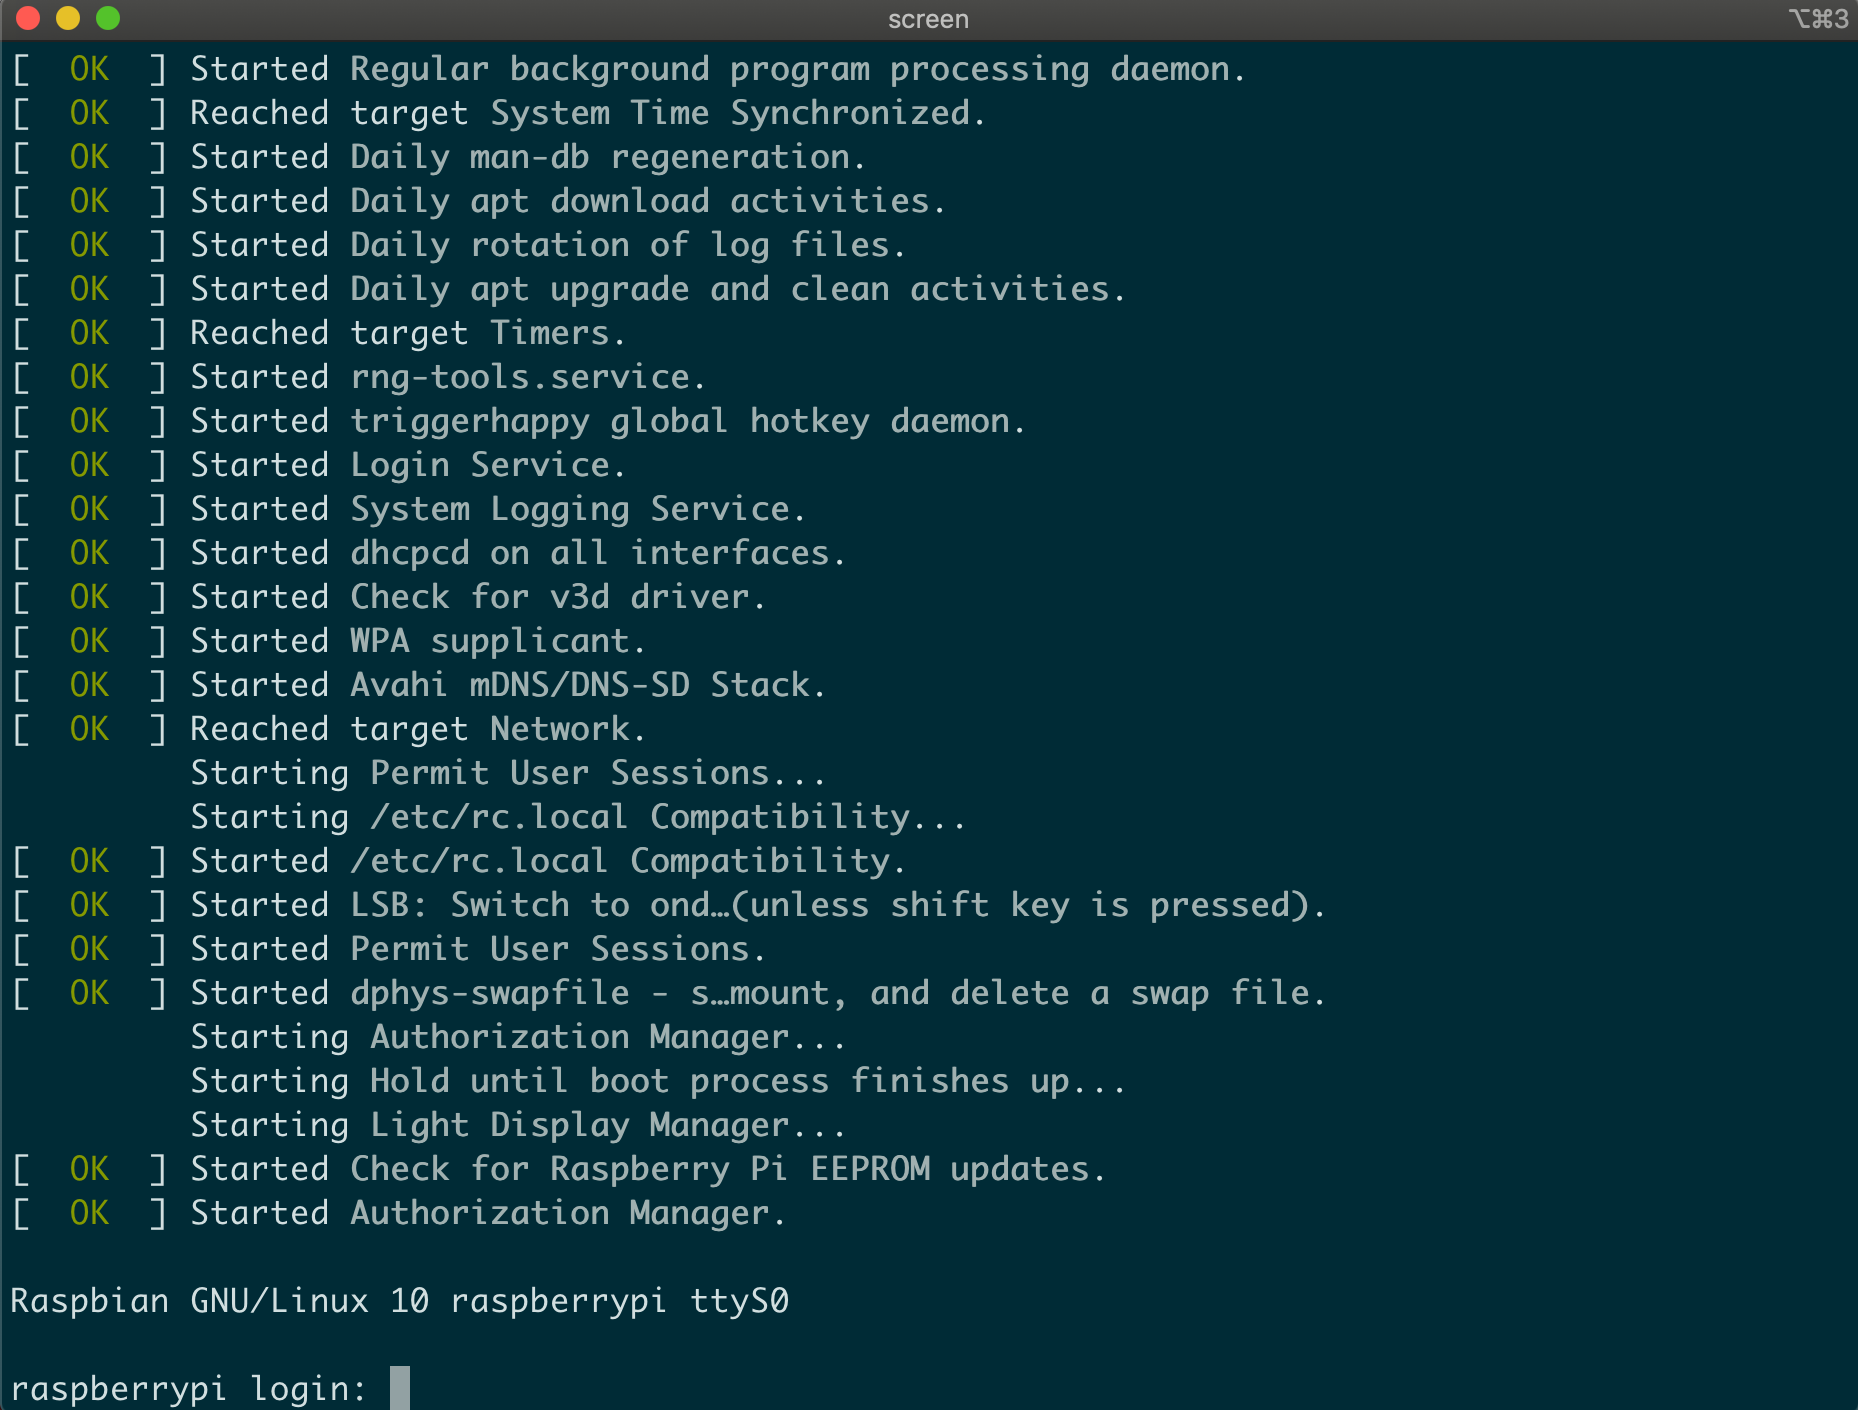
It worked! If we use:
username : pi
password : raspberry
We should be at a working Linux console :)
← Previous ... Next →